

Table of Contents
FILE HANDLING in PL/1
File handling process in PL/1 is similar to the FILE handling process in FORTRAN. There are four major steps involved in it.
* Define the file – DECLARE
* Open the file – OPEN FILE
* Process information in the file – READ or WRITE or REWRITE
GET or PUT
* Close the file – CLOSE FILE
The set of records in a file or data set is identified by PL/1 by its name. The file name length should not be more than seven characters.

DECLARE Statement
The file must be declared explicitly in a DECLARE statement.
Syntax :
DECLARE <file name> FILE (Attributes);
Examples :
DECLARE FINANCE FILE (Attributes);
The attributes of the DECLARE statement are the Type of transmission, the Direction of transmission and the physical environment of the file.
Type of transmission – STREAM / RECORD.
Direction of transmission – INPUT, OUTPUT or UPDATE
Physical Environment – consists of physical characteristics of the file as RECSIZE or BLKSIZE.
OPEN Statement
All the files in the PL/I program has to be opened explicitly and the reason for the OPEN St. is to specify additional attributes at open times. Several files can be opened with a OPEN St.
When the OPEN St. is executed the following seq. of steps are taken care,
1. The device readiness is checked.
2. All the attributes which are specified in JCL, DECLARE and OPEN St. are merged together to form the description of the file.
3. If the files are Disk or Tape, the labels of the data sets are also checked.
Syntax:
OPEN FILE (filename1), FILE (filename2)….;
Example:
OPEN FILE (MASTER), FILE (FINTRANS);
NOTE:
# For the STREAM files, the files are automatically opened when the first GET or PUT command is issued. In case the file is with PRINT attribute, automatic advance of a new page is initialed for the first PUT command.
# For the STREAM files, the attributes can be specified as follows,
OPEN FILE (PRT) PAGESIZE(55);
OPEN FILE (PRT) LINESIZE(133);
Caution : PAGESIZE & LINESIZE can be appeared only with OPEN statement, not with DECLARE statement.
# Another option of the OPEN statement is with TITLE option.
OPEN FILE (MASIN) TITLE (FINMAS)
MASIN is a logical file name used in PL/I program
FINMAS is the physical file name associated with logical one in DD St.
CLOSE Statement
The file name alone has to be used in the CLOSE St. The attributes or options should not be specified in CLOSE Statement. This is optional, because when PL/I program ends, all the files are automatically closed. At the same time the same file attributes are changed and opened once again in the same PL/I program, then the file must be closed before opening.
If the program terminates abnormally, then the files will not be closed properly. So after fixing the problem, the file has to be created once again. When closing the files the filename is dissociated from the data set.
Syntax :
CLOSE FILE (filename);
Example:
CLOSE FILE (MASTER);
STREAM I/O
In the STREAM I/O, all the input and output data items are in the form of continuous stream of characters. The characters from the INPUT stream are automatically converted to the internal attributes of the identifiers specified in the GET Statement.
On the OUTPUT, the coded arithmetic data items are automatically converted back to character form before the output takes place.
LIST DIRECTED INPUT & OUTPUT
List directed Input and Output Statements are used to have the transmission between the Application program and I/O devices.
GET LIST – is the Input statement, which read the data from the system devices such as diskette reader and Card reader. any type of PL/I constants can appear in the GET list St.
Syntax :
GET LIST (name of the data item 1, …. etc.)
Examples :
GET LIST (A,B,C,D,E);
or
GET LIST (A);
….
GET LIST (B);
The input will be 100 90 80 70 60 for both above said statements.
Note 1 : GET LIST (A,B,C) COPY; results the data will be echoed on the system printer. It Causes the values of A, B & C to be appeared on the printout at the predetermined tab positions.
Note 2 :
GET LIST (A,B,C);
GET LIST (D,E);
If the input values are 100 90 80 70 60 in first line and 101 91 in second line. The system will not consider the second line input. Since there is a balance values available the system will consider D = 70 & E = 60.
PUT LIST : The data items specified for output are printed beginning at the predetermined tab positions. The default positions of the tab are, 1, 25, 49, 73, 97 & 121.
Syntax :
PUT [PAGE] [LINE(n)] [SKIP(n)] LIST (Data items);
Examples :
PUT LIST (50,’ABC’, 123, 127);
PUT LIST (‘ ‘,’ ‘,’TEST DATA’); – Results the printing starting position from 49.
PUT PAGE LIST(‘TESTDATA’); – Results start in a new page.
PUT SKIP LIST(‘TEST DATA’); – Results skip one line before print
PUT SKIP(2) LIST(‘TEST’); – Results Two lines skip before print
PUT SKIP(0) LIST(‘TEST’); – Results suppression of the line feed
PUT LINE(10) PAGE LIST(A,B,C); – Results prints on the new page at 10 th line.
PUT LINE(15) – Sets current line counter to 15
PUT SKIP (2) – Skips the two lines
PUT PAGE – Sets a new page
Note :
You cannot specify a LINE No. that is negative or zero. If it is negative or zero number, then the PL/I will consider as 1.
Advantage:
Easy to code and useful debugging tool
Disadvantage
In GET LIST, all data items must be separated by spaces or commas, more space is required to specify the Input stream of data.
In PUT LIST, all data items can be specified in the predetermined Tab positions on the printer, thus the flexibility on designing the reports is reduced.
EDIT-DIRECTED INPUT & OUTPUT
EDIT DIRECTED I/O eliminates some disadvantage of the LIST-DIRECTED I/O. It is not easy to code, but it will provide considerable amount of efficiency in the representation of INPUT data and flexibility in formatting the OUTPUT data for the printed reports.
GET EDIT (data item list) (format item list);
PUT EDIT (data item list) (format item list);
Format items are divided into three categories,
1. Data format items – describes whether the data items in the stream are Character or Arithmetic values.
2. Control format items – describing the page control, line control & spacing operations.
3. Remote format items – indicates that one or more data format items and control format items are located remotely from the GET or PUT EDIT St. The remote format item is identified in the GET/PUT EDIT as R(…)
GET EDIT (TOKEN NO, NAME, DOJ,DOB,BONUS),(R(FORM1));
FORM1: FORMAT(COLUMN(1),A(6),A(20),A(10),A(10),F(9,2));
* The Data list and Format list must be enclosed by parentheses and separated by commas.
* The Format list describes the characteristics of the external data.
* The Data list mentions the data items on the external medium.
* The external data formats of the Format list must not match the data declarations of the main storage.
DCL X CHAR(15);
GET EDIT (X) (A(20));
* All data items have corresponding format items.
GET EDIT(X,Y)(F(9,2), F(7,2));
* If Format items are more than the Data items then the extra format items are ignored.
GET EDIT(X,Y)(F(9,2),F(10),F(8,2));
In the above said example the last format will not be considered.
* If Format items are less than the Data items then there is a repeat to the beginning to the Format list.
GET EDIT(X,Y,Z)(F(9,2),F(10));
In the above said example the format of Z is F(9,2).
* Output data items may be Built-in Functions.
PUT EDIT(SUBSTR(X,5,3)) (A(3));
* Output data items may be PL/I constants.
PUT EDIT(‘SYSTEM AUDIT REPORT’)(COLUMN(20),A(30));
* Output data items may consists of element expressions.
PUT EDIT(X+Y, Z)(F(9,2),F(7,2));
* More than one data list and format list can be specified in one GET EDIT or PUT EDIT St.
GET EDIT (X,Y,Z) (F(12),A(10),F(9,2)) (A,B) (X(10),X(12));
NOTE:
In some PL/I implementation the COLUMN control format is not available. To accomplish the spacing between the records, we can use X control formats.
GET EDIT (A, B) ( A(70), X(2),A(20));
STRING option in PL/1 Programming
The STRING option provides another method of character type of data to a coded arithmetic form. The string option causes the internal data transfer. It doesn’t cause any I/O operations. The STRING option can be used in the place of FILE option.
The STRING option facilitates manipulation of the different record formats in the same file.
GET STRING (X) EDIT (EMPNAME,FAT_NAME,SPO_NAME)(A(20));
This St. specifies that the FIRST 20 characters of X are to be assigned to EMPNAME, the next 20 characters of X to FAT_NAME and so on.
PUT STRING (X) EDIT (EMPNAME,FAT_NAME,SPO_NAME)(A(20));
This St. specifies that the values of EMPNAME, FAT_NAME & SPO_NAME are concatenated and assigned to the string X.
DATA FORMAT ITEMS :
A(w) – On input the string length of w characters is read into a variable. If the variable’s declared length is greater than w char. then blanks are padded on the right. If the length is less than w characters, input data will be truncated on the right.
A – This format can be used for Output only. the length of the character string is the value of the declared character string length.
B(w) – On input the string length w characters is read into the variable. Only 0 or 1 should appear in the input stream or the CONVERSION condition is raised. If the variable’s declared length is greater than w characters, then 0 is padded on the right. If it is less than w characters, input data will be truncated on the right.
B – This format must be used only with Output. the length of the bit-string variable is the value of the declared bit-string length.
1101 B 1101
1101 B(4) 1101
1101 B(3) 110
1101 B(6) 1101bb
E(w,d) – The Input stream consists of floating-point notation. The letter w represents the total number of characters including decimal point, signs and designation E and d represents the no. of fractional decimal places.
E(w,d,s) – For the Output stream, this format is used and s represents the number of significant digits output.
F(W) – This format can be used both in Input and Output and it consists of w characters containing a fixed point decimal value. On input, if no decimal points are present, the number is an integer. A minus sign precedes a negative number and for positive values, plus sign is optional. On Output, the data item is printed as an integer and no decimal point appears. Sign is appearing as Input and automatic zero suppression is taken care.
123 F(3) 123
-123 F(3) SIZE ERROR
-123 F(4) -123
123 F(5) bb123
F(w,d) – On the Output, if there is no decimal point is specified, its is assumed that there are d decimal places in the field. If the decimal point is actually present, its portion overrides the d specifications.
123.45 F(4,0) b123
123.45 F(6,2) 123.45
123.45 F(7,3) 123.450
123.45 F(6,1) b123.4
123.45 F(5,2) SIZE error
123.45 F(4,0) b123
F(w,d,p) – The designation p is the scaling factor. Normally it returns with the sign. If it is +ve, the decimal point appeared p positions to the right of the given position. If it is -ve, then the decimal point appeared p positions to the left of the given position.
1234.56 F(9,2,2) bbb123456
1234.56 F(9,2,-2) bbb12.3456
123.56 F(9,2,1) bbb1235.6
X(w) – On input w characters are ignored. On the output, w blanks are inserted into the stream.
CONTROL ITEMS :
When control items PAGE, LINE, SKIP & COLUMN are appeared inside the format list, it is called CONTROL FORMAT ITEMS. If they appears outside the format list, it is called CONTROL OPTIONS.
PUT PAGE EDIT (A,B) (SKIP(4),F(9),F(7,2));
| |
| |
Control Option Control format item
PUT EDIT(X,Y) (PAGE, A(20), A(30));
PUT EDIT(X,Y) (COLUMN(10), A(20), COLUMN(40), A(30));
DATA-DIRECTED I/O
The DATA-DIRECTED I/O gives the programmer the flexibility of transmitting self-identifying data.
DATA-DIRECTED INPUT
- The GET DATA will read all data items until a semicolon is detected.
- The maximum number of elements permitted in a list is 320.
- The data list may include the name which is not there in stream.
- The data list in the GET St. is also optional. Can be specified as GET DATA; The semicolon determines the number of items to be obtained from the stream.
- The data list may have more names than the input stream.
- The data list must not have less names than the input stream.
- The data list includes the names of an array, subscripts ref. to that array may appear on the Stream. It is not necessary to have all array values on the stream.
Syntax :
GET DATA (data list);
Examples :
Let u consider the input stream is X= 1, Y = 20, Z =1.121, V = ‘VARY’;
Normal GET St. is, GET DATA (X,Y,Z,V);
GET DATA; /* Correct one */
GET DATA(X,Y,Z,V,Q); /* Correct St. which may have more names than Stream */
GET DATA(X,Y); /* Error St. which has less number of names than Stream */
DCL TAB(10) FIXED DEC(7,2);
GET DATA (TAB);
DATA-DIRECTED OUTPUT :
Each data item is placed in the stream in the form of assignment St. separated by blanks. The last data item in the stream followed by a semicolon. Leading Zeros of arithmetic data are suppressed. Only the data names may be the output. If the output is the print file, then the position of the data item on printer is aligned as LIST directed output. If the output is other than print file, one blank is placed between each data items.
The data list may be an element, array, subscripts name, structure variable … etc.
PUT PAGE DATA (A,B,C);
PUT SKIP(3) DATA (A,B,C);
PUT LINE(6) DATA (A,B,C);
PUT DATA;
PUT DATA(‘ XXXXXXXXXXX XXXXXX XXXXXX’); / * IS ERROR ST */
COUNT Function
This function is very useful when we are not specifying the Data list of GET & PUT. COUNT function is used to determine the number of data items that were transmitted during GET or PUT operation on a file.
GET FILE (TRANS) DATA;
I = COUNT(TRANS);
Note :
If a begin block or another procedure called during GET or PUT operation and within block or another procedure one more GET or PUT St. executed for the same file, the value of the previous one is reset and new count will set for the file.
RECORD I/O
RECORD I/O is used by business or commercial application programmers in major and also by scientific programmers. Record I/O does not verify the validity of the data and not performing any conversions.
The main advantage of the RECORD I/O over the STREAM I/O is that data in the format other than character may be read or written.
- Since it has relatively little processing to perform, is faster and requires less main storage than STREAM I/O.
- In RECORD I/O, the READ statement simply transfers a complete record into main storage location.
- When the WRITE statement is executed, if the output is to printer, then one line is printed.
RECORD INPUT
READ FILE(DATA) INTO (DATA_AREA);
DATA AREA is the new parameter defined by a programmer as a identifier into which the data record is to be placed.
INTO is a PL/I keyword.
RECORD OUTPUT :
WRITE FILE (PRT) FROM (PRT_AREA);
PRT_AREA is also new parameter defined by the programmer from which data is to be written.
FROM is a PL/I keyword.
Note : The data area of the READ & WRITE St. of the RECORD I-O can be a character string, an array, a structure.
Example :
DCL TABLE (20) CHAR(4);
READ FILE (INP) INTO (TABLE);
CARRIAGE CONTROL in RECORD I/O :
Using this method we can handle the Page Overflow in RECORD I/O, by counting the number of lines that are being used as output. Each time when the WRITE St. issued for the output file then the program counter would be incremented by one. When the program counter reaches the max. number, then the program will issue the SKIP command to output file.
This can be done in PL/I program by appending a single character to the beginning of the each record.
Two different carriage control characters may be used in PL/I., such as CTLASA & CTL360.
It is necessary to specify the carriage control keyword to the ENVIRONMENT section of the file declaration.
DCL PRT OUTPUT RECORD ENV(F RECSIZE(133) CTLASA);
The difference between the CTLASA & CTL360, is that when CTLASA is specified, the carriage control operation will take place before the print operation, whereas if CTL360 is used, it will be after the print operation.
Normally CTL360 is faster than CTLASA. Generally programmers prefer CTLASA.
Carriage control characters used with CTLASA option,
Character Code Resulting control operation
Blank Spaces one line before printing.
0 Spaces Two lines before printing.
– Spaces three lines before printing.
+ Suppresses space before printing.
1-9 Skips to channel 1 to 9 before printing respectively.
A-C Skips to channel 10 to 12 before printing respectively.
V Selects stacker 1.
W Selects stacker 2.
RECORD I/O Vs. STREAM I/O :
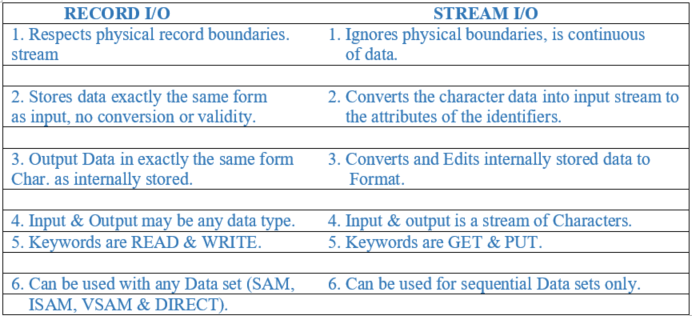
6. Can be used with any Data set (SAM, 6. Can be used for sequential Data sets only.
ISAM, VSAM & DIRECT).
STRUCTURES in PL/1 Programming
STRUCTURE is a collection of data items whose locations are relative to one another and they have logical relationship to each other. (Like Group data item in COBOL)
DCL 1 GRP_NAME.
2 EMP_NAME CHAR (20),
2 EMP_DEPT CHAR (04),
….
Major structure names must always have the level number 1.
Any level numbers greater than 1, can be used for the sub division of the group.
The level number that is not sub divided further is called elementary item
The major structure name does not contain attributes. The major structure name is specified in READ & WRITE St.
READ FILE (X) INTO (MAJ_STRU_NAME1);
WRITE FILE (Y) FROM (MAJ_STRU_NAME2);
The carriage control character is the first elementary item in the output structure.
DCL 1 MAJ_STRU_NAME2,
2 CARR_CONTL CHAR(1),
2 EMP_NO CHAR(6),
2 UNUSED_1 CHAR(2) INIT (‘ ‘),
2 EMP_NAME CHAR(20),
2 UNUSED_2 CHAR(2) INIT (‘ ‘),
The names specified in the structure must be unique.
STRING is a built-in function, used to concatenate a number of elementary items found in a structure or array.
TEST = MAJ_STRU_NAME1; /* ERROR */
TEST1 = STRING (MAJ_STRU_NAME1); /* VALID */
FACTORED Attribute :
Grouping the identifiers together for the purpose of given them a common attribute.
DCL 1 EMP_REC,
2 NAME,
3 FIRST CHAR(20),
3 LAST CHAR(20),
2 NO CHAR(06),
2 PAY,
3 BASIC PIC ‘999,999V99’,
3 HRA PIC ‘999,999V99’,
3 LTA PIC ‘999,999V99’;
Can be restructured as,
DCL 1 EMP_REC
2 NAME,
3 (FIRST, LAST) CHAR (20),
2 NO CHAR (20),
2 PAY,
3 (BASIC, HRA, LTA) PIC ‘999,999V99’;
INITIAL Attribute :
Elementary data items in the structure may be initialized using the INITIAL attribute, providing the structure is not overlay-defined on another structure.
LIKE ATTRIBUTE:
The LIKE attribute is used to create same structure with the same minor structure name.
DCL 1 EMP_REC,
2 EMP_NAME,
3 FIRST CHAR(20),
3 LAST CHAR(20),
2 EMP_NO CHAR(20);
DCL 1 EMP_DTL LIKE EMP_REC;
The EMP_DTL structure will have the same structure as EMP_REC.
STRUCTURE ASSIGNMENT in PL/I Programming
Structure To Structure :
The structures can be moved to other structures or parts of the structure. The structure name to the right side of the assignment must have the same relative structuring to the left one. That is the structures must have the same minor structuring, the same number of elementary items within each minor & major structure.
Structure Assignment by Name :
BY NAME option must appear in an assignment statement and it must always be preceded by comma. If the structure contains minor structure name, then the names also be identical for matching elementary names to be moved.
DCL 1 X,
2 EMP_NAME CHAR(20),
2 EMP_NO CHAR(6),
2 EMP_ACC CHAR(6),
2 EMP_SAL,
3 EMP_BASIC PIC ‘99,999,999V99’,
3 EMP_HRA PIC ‘99,999,999V99’,
3 EMP_FEB PIC ‘99,999,999V99’
2 EMP_WRK_HRS PIC ‘999’;
DCL 1 Y,
2 CARR_CNTL CHAR(1),
2 EMP_NO CHAR(6),
2 EMP_NAME CHAR(30),
2 EMP_WRK_HRS PIC ‘999’;
Y = X, BY NAME;
If any change in the minor structure name then the assignment will not be happened.
Scalar to Structure :
A scalar is a single data element. You may assign a scalar to a structure.
DCL 1 X
2 EMP_NAME CHAR(20),
2 EMP_NO CHAR(06),
2 EMP_ACC CHAR(30);
X = ‘ ‘;
When a blank character assigned to the larger character field, there is padding on the right with blanks.
Scalar variable on a Structure :
The DEFINED attribute allows to refer to the same area of the storage by different names and different attributes.
DCL X CHAR(20) DEFINED Y;
A character string X with the length of the attribute as 20 character was overlay defined on the Y structure.
ARRAYS in STRUCTURE :
Like a structure, array is a collection of data. Unlike a structure, all elements in an array have identical attributes.
DCL 1 EMP_REC (200),
2 EMP_NAME,
3 FIRST CHAR(20),
3 LAST CHAR(20),
2 EMP_NO CHAR(06),
2 PAY,
3 BASIC PIC ‘999,999V99’,
3 HRA PIC ‘999,999V99’;
&
DCL 1 STU_INFO,
2 STU_NAME(40) CHAR(20),
2 STU_NO (40) CHAR(06),
2 STU_GR_MARK(40) PIC ‘999’;
PICTURE Attribute :
Syntax :
PICTURE ‘specification characters’
Example :
DCL X PICTURE ‘9999V99’; /* NORMAL */
DCL Y PICTURE ‘(5)9V99’; /* REPETITIVE*/
a) 9 – indicates any decimal digit.
b) V – indicates the assumed location of a decimal point & causes decimal alignment.
c) S – indicates the sign of the value + if it is > 0 & – if it is < 0.
d) + – indicates a plus sign (+) is a character representation of the variable if the value is greater than or equal to zero and blank is to appear if the value is less than zero.
e) – – indicates a minus sign (-) is a character representation of the variable if the value is less than zero and blank is to appear if the value is greater than or equal to zero.
d) Z – indicates Zero suppression.
Consider the input is 123.45
PIC ‘ZZZZV.99’ /* The output is bb123.45 */
PIC ‘SZZZZV.99’ /* The output is +bb123.45 */
PIC ‘ZZZZV.99S’ /* The output is bb123.45+ */
e) . – indicates Decimal point is an insertion character. The decimal point is not causing as alignment character, the V accomplishes this function.
Consider the input 76.55
PIC ‘999V.99’ /* The output is 076.55 */
PIC ‘999V99’ /* The output is 07655 */
PIC ‘999.99 ‘ /* The output is 000.76 */
Consider the input is 76.5
PIC ‘V999’ /* The output is .765 */
PIC ‘VZZ.9’ /* The output is 76.5 */
f) , – Comma is another insertion character.
Consider the input is 55678.00
PIC ‘ZZZ,ZZZV.99’ /* The output is b55,678.00 */
Consider the input is 450.75
PIC ‘ZZZ,ZZZV.99’ /* The output is bbb450.75 */
g) B – Blank is another insertion character.
/ – is the insertion character used to insert slashes at the specified position in the picture.
Primarily for inserting slashes between the month, day and year portion of the date field.
DCL SYS_DATE PIC ‘Z9/99/99’; /* VALID ONE */
SYS_DATE PIC ‘Z9/Z9/99’; /* ERROR ONE */
h) $ – sign specifies a currency symbol in the character representation of the numeric data.
This character can be used in two diff manner static or drifting. If it is static manner then a currency symbol appears in the fixed position.
PIC ‘$999V.99’ – /* $23.45 is the output if the input is 23.45 */
In the drifting form, the leading zeroes are to be suppressed and the rightmost suppressed zero will be replaced with $ symbol.
PIC ‘$$$$V.99’ – /* b$23.45 is the output if the input is 23.45 */
i) * – is a fill character and used as Z.
PIC ‘*****V**’ – /* ***23.45 is the output if the input is 23.45 */
j) CR / DB Characters :
CR – Credit Characters.
DB – Debit Characters.
CR – Indicates that the value of the data is negative. Otherwise two blanks will be replaced.
DB – Indicates that the value of the data is positive. Otherwise two blanks will be replaced.